
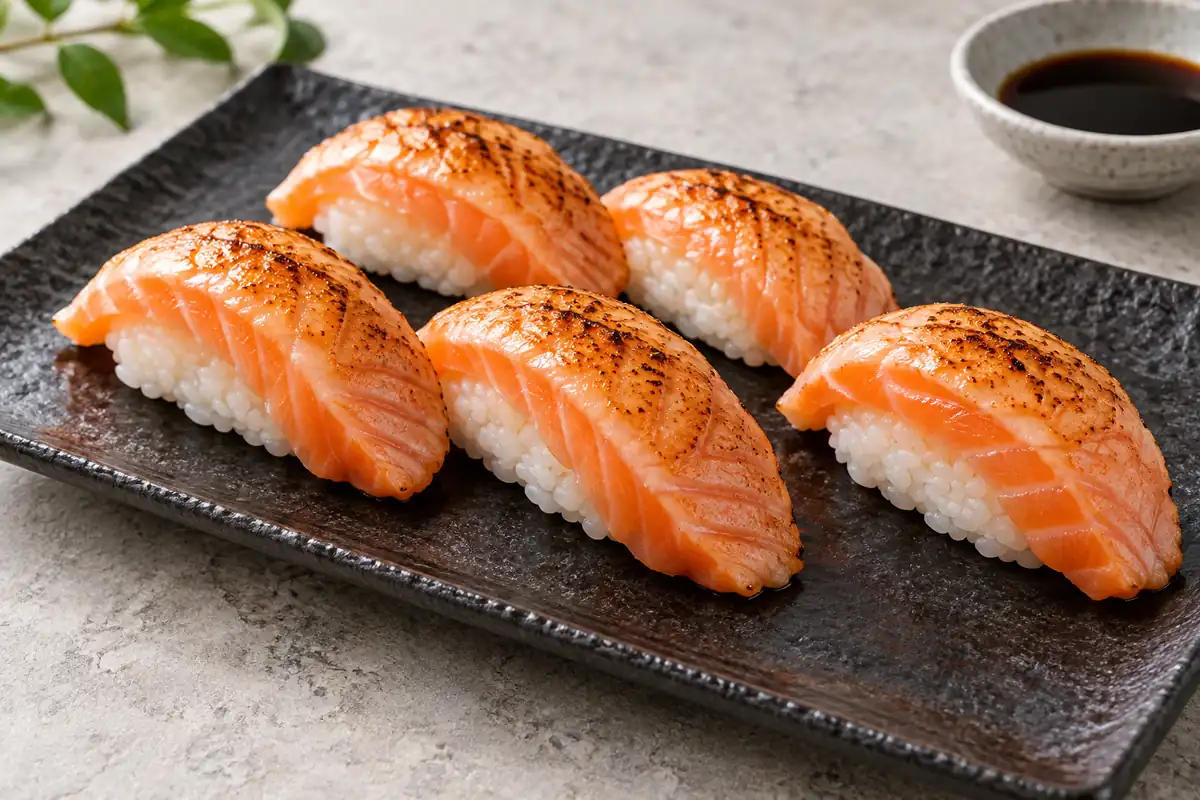
Aburi salmon nigiri is hand-shaped sushi rice topped with salmon that has been briefly seared on the surface. The heat lightly browns the outside and softens the salmon’s fat, while the center can remain raw or undercooked.
To make it at home, prepare seasoned sushi rice, cut broad salmon slices, briefly torch the fish on a suitable heatproof surface, and place each slice over a gently shaped rice oval. Serve immediately so you can enjoy the contrast between the seared topping and tender rice.
The important distinction is that aburi is a surface-searing technique, not a guarantee that the fish is fully cooked. Choose and handle the salmon according to its intended raw or undercooked use. For a fully cooked variation, use the alternative method below.
This recipe has not been kitchen-tested. Cooking and preparation times are estimates, and your rice package and torch manufacturer’s instructions take priority.
What Is Aburi Salmon Nigiri?
Aburi salmon nigiri combines two techniques: hand-shaping seasoned rice and applying brief, direct heat to the salmon topping.
The rice is formed into a small oval rather than rolled in seaweed. A thin salmon slice rests over it, with enough overhang to cover the top and gently drape around the sides.
The searing step changes the surface. Small browned patches develop, some fat becomes glossy, and the aroma becomes more pronounced.
If you are learning the basic terms, start with our guide to nigiri sushi. This article focuses specifically on preparing the lightly seared salmon variation.
Aburi salmon nigiri vs regular salmon nigiri
The main difference is the treatment of the topping.
| Feature | Regular salmon nigiri | Aburi salmon nigiri |
|---|---|---|
| Salmon surface | Commonly served without searing | Briefly seared |
| Flavor | Mild, rich salmon flavor | Salmon flavor with toasted notes |
| Texture | Usually soft throughout | Lightly changed surface with a softer center |
| Equipment | Sharp knife and rice equipment | Same equipment plus a suitable searing tool |
| Fully cooked? | Depends on preparation | Not necessarily |
For the basic rice preparation and shaping method, see our salmon nigiri recipe.
What Does Aburi Salmon Taste Like?
Aburi salmon has a richer toasted aroma than an unseared slice. The surface may become slightly firmer, while the fat immediately beneath it softens.
The contrast is the appeal. The topping should still feel delicate rather than dry or heavily charred.
Seasoned rice adds mild acidity, sweetness, and salt. A restrained amount of wasabi or soy sauce can complement that balance, but heavy sauces can hide the flavor of the salmon.
You do not need mayonnaise, cheese, or a thick sweet glaze to make this version. Begin with plain salmon and seasoned rice so you can judge the effect of the searing technique.
Ingredients
For the sushi rice
- 200 g Japanese short-grain white rice, approximately 1 US cup
- Water according to the rice package
- 2 tablespoons unseasoned rice vinegar, 30 ml
- 2 teaspoons granulated sugar, approximately 8 g
- 1/2 teaspoon fine salt, approximately 3 g
For the salmon topping
- 240 g skinless, boneless salmon, prepared and handled for its intended raw or undercooked use
- A small amount of wasabi, optional
- Soy sauce or verified gluten-free tamari, served separately
- Pickled ginger, optional
For shaping
- A small bowl of clean water
- Clean hands and a clean serving plate
This quantity makes approximately 16 pieces, depending on the size of your slices and rice portions. Allow about four pieces per appetizer serving.
Which rice should you use?
Japanese short-grain white rice is a practical choice because its cooked grains hold together naturally.
Long-grain varieties such as basmati do not produce the same texture. Adding more pressure during shaping will not make them behave like sushi rice.
Use unseasoned rice vinegar for the quantities above. If your vinegar already contains sugar and salt, adjust the seasoning rather than adding everything automatically.
Equipment for Aburi Salmon Nigiri
You will need:
- A saucepan with a lid or a rice cooker
- A wide bowl for seasoning the rice
- A rice paddle or spatula
- A sharp knife
- Separate preparation surfaces for raw seafood and ready-to-eat ingredients
- A kitchen torch approved by its manufacturer for culinary use
- A stable, noncombustible work area
- A torch-compatible metal tray and rack, or another surface specifically suitable for direct flame
- A food thermometer for the fully cooked alternative
Do not assume that an ordinary plate, glass dish, silicone mat, or nonstick tray can tolerate direct torch heat.
Keep packaging, towels, paper, and other combustible materials away from the flame. Follow the torch instructions for ventilation, lighting, operation, and cooling.
For this home method, sear the salmon separately before transferring it onto the rice. That makes it easier to keep the flame away from the rice and serving plate.
Choosing Salmon for Aburi
A relatively even, center-cut portion is easier to slice than a thin tail section. Look for a piece that allows broad slices rather than small chunks.
Ask the supplier whether the specific salmon is intended for raw consumption and how relevant hazards have been controlled. The fact that you plan to sear the surface does not remove the need for that conversation.
Fresh appearance alone cannot establish suitability for raw or undercooked preparation.
The FDA’s seafood safety guidance explains that freezing can address parasites but does not eliminate all harmful germs. Thorough cooking remains the lower-risk option.
Keep the salmon refrigerated until needed. If frozen, thaw according to the packaging instructions, including any directions about opening vacuum packaging before thawing.
How to Make Aburi Salmon Nigiri
1. Rinse and cook the rice
Rinse the rice in several changes of cool water, gently moving the grains with your fingers. Drain well.
Cook according to the package or rice cooker instructions. Different rice varieties and appliances require different water quantities, so use those directions rather than assuming one universal ratio.
Once cooked, allow the rice to rest as directed before transferring it to the seasoning bowl.
2. Prepare the rice seasoning
Combine the rice vinegar, sugar, and salt. Stir until dissolved, warming gently if necessary.
The mixture should add flavor without overwhelming the rice. Do not boil it down into a syrup.
If using commercially seasoned sushi vinegar, follow its recommended quantity and omit additional sugar and salt unless needed.
3. Season and cool the rice
Transfer the hot rice to a wide bowl. Sprinkle the seasoning over it and fold gently with a rice paddle.
Use a cutting and lifting motion rather than vigorous stirring. The goal is to distribute the seasoning while keeping the grains intact.
Spread the rice enough to release steam. Let it become barely warm before shaping and adding the fish.
Do not treat vinegar seasoning as permission to hold homemade sushi rice at room temperature for hours.
4. Slice the cold salmon
Check for pin bones and remove any remaining skin.
Using a sharp knife, cut approximately 16 broad slices, about 15 g each. Aim for slices that will cover a small rice oval and slightly overhang its ends.
A starting thickness of around 4 to 5 mm can be manageable, although the shape of the fish will affect the dimensions.
Use a smooth slicing stroke where possible. Repeated sawing can produce ragged edges and make the slices harder to transfer after searing.
Keep most of the salmon refrigerated while working with a small batch.
5. Shape the rice
Lightly moisten your clean fingers. Shake off excess water so your hands are damp rather than dripping.
Take approximately 20 to 25 g cooked rice and form a short oval with a few gentle presses.
The rice should hold together without becoming a dense ball. If it feels tightly packed, reduce the pressure on the next piece.
Prepare only a few rice ovals at a time so you can top and serve them promptly.
6. Prepare the searing area
Set up the torch-compatible tray and rack on a stable, noncombustible surface.
Arrange a few salmon slices in a single layer with space between them. Blot excess surface moisture gently with disposable kitchen paper, then remove the paper from the work area.
A wet surface can make browning less effective, but do not leave the fish out to dry for an extended period.
Check that your serving plate and shaped rice are ready before lighting the torch.
7. Sear the salmon surface
Light the torch according to the manufacturer’s instructions.
Sweep the flame steadily across the salmon rather than holding it in one spot. Follow the manufacturer’s recommended operating distance.
Watch for the surface to become glossy, slightly opaque, and lightly browned in places. Stop before the topping becomes heavily blackened or starts breaking apart.
There is no reliable universal number of seconds: torch output, distance, slice thickness, and fish temperature all affect the result.
Remember that surface color does not establish a fully cooked internal temperature.
8. Transfer onto the rice
Turn off the torch and place it safely according to its instructions.
Use clean utensils to transfer each seared slice onto a rice oval. A thin spatula can help support the fish so it does not tear.
If using wasabi, add a tiny dab between the salmon and rice. Gently settle the topping around the mound.
Work carefully and avoid repeatedly pressing the warm, softened surface.
9. Serve immediately
Arrange the completed pieces on a clean plate.
Serve soy sauce and pickled ginger separately. Pouring sauce over the whole plate can make the rice wet and difficult to pick up.
For a larger group, assemble in small batches rather than leaving a large platter out while you continue cooking.
How Much Should You Sear the Salmon?
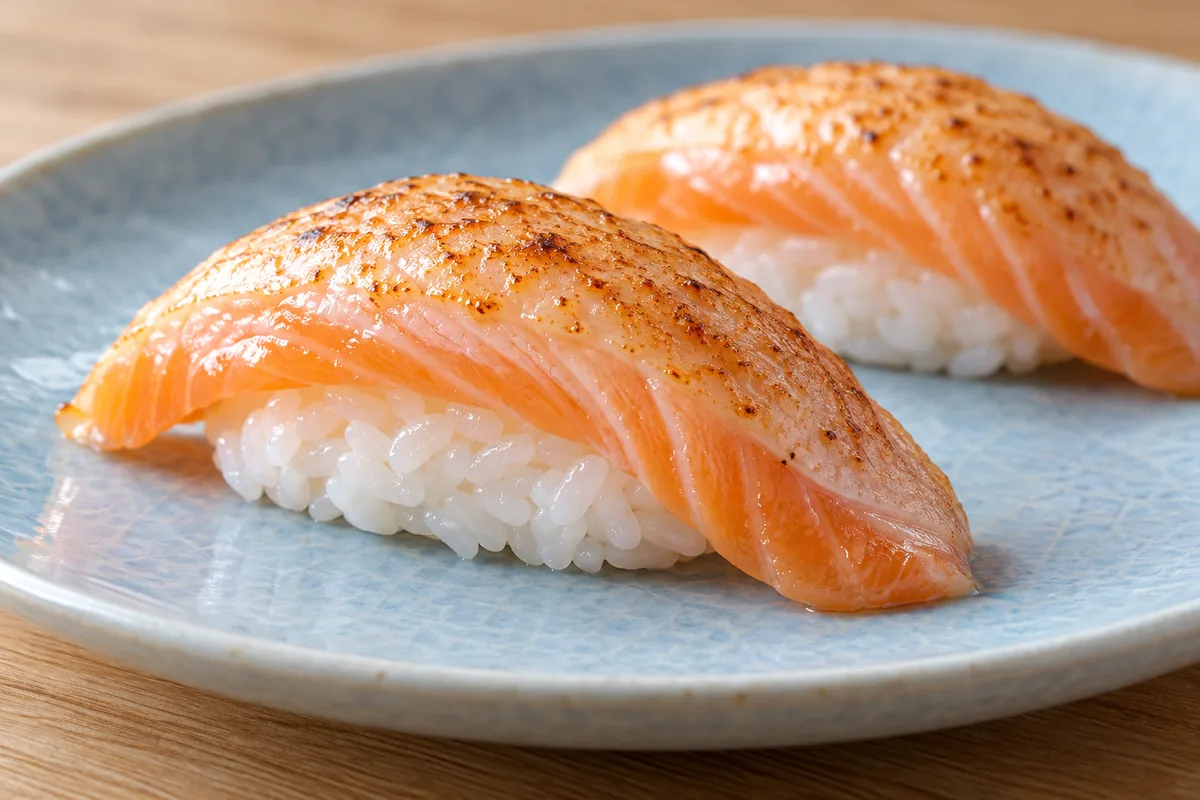
For the lightly seared version, the objective is a changed surface with some toasted color.
You are not trying to produce a thick crust or burn every visible area. Small browned patches are enough to create a noticeable difference.
The underside and center may remain raw or undercooked. That is why sourcing and handling are still important.
If your aim is fully cooked salmon, use a thermometer and a cooking method that heats the entire portion. A torch is not a reliable shortcut for confirming that every slice has reached a safe internal temperature.
Can You Make Aburi Salmon Without a Torch?
A kitchen torch gives direct control over surface browning, but you should only use one if you can operate it in a suitable setting.
A broiler can brown fish, but it behaves differently. Thin slices may cook through quickly, stick, or become difficult to move. Do not assume that torch timing transfers to a broiler.
For a simple alternative, prepare a fully cooked salmon nigiri variation:
- Cook a skinless salmon portion using your preferred suitable method.
- Check that it reaches 145°F, 63°C, internally.
- Divide gently into pieces that fit the rice.
- Place over the shaped rice and serve promptly.
The cooked fish will be more flaky than a raw or lightly seared slice. A narrow strip of nori can help hold it together if needed.
Label this clearly as a fully cooked variation so readers and guests understand the difference.
Common Aburi Salmon Nigiri Mistakes
| Problem | Likely cause | Adjustment |
|---|---|---|
| Salmon burns in isolated spots | Flame held still | Keep the flame moving |
| Surface stays wet | Excess moisture | Blot gently before searing |
| Slice tears during transfer | Thin or unsupported topping | Use a broad, thin spatula |
| Rice feels dense | Too much shaping pressure | Use fewer, lighter presses |
| Fish overwhelms the rice | Thick salmon portions | Cut broader, thinner slices |
| Nigiri falls apart when dipped | Rice absorbs too much sauce | Use a small amount of soy sauce |
Another common mistake is adding several rich toppings before learning the basic method.
Start with salmon, rice, and restrained seasoning. Once you understand the texture, you can decide whether an additional garnish improves the dish.
Serving Suggestions
Aburi salmon nigiri can be an appetizer or one component of a larger meal.
Serve it with cucumber salad, edamame, or miso soup. These accompaniments add variety without requiring a heavily dressed sushi platter.
Keep garnishes small and purposeful. A little sliced scallion can add freshness, but it should not cover the topping.
For the difference between this style and fish served without rice, read our nigiri vs sashimi comparison.
Make-Ahead and Storage
Prepare the serving dishes and measure the seasoning ingredients ahead if that helps your workflow.
Keep the salmon refrigerated until needed, and make the rice close enough to serving that you can shape it without a long holding period.
If rice must be stored, cool it quickly and refrigerate promptly. The UK government’s home food guidance advises consuming refrigerated cooked rice within 24 hours.
Aburi salmon nigiri is best assembled and eaten promptly rather than prepared as several days of meal prep.
Keep perishable ingredients at 40°F, 4°C, or below when refrigerated. Discard perishable food left out for more than two hours, or more than one hour above 90°F, 32°C. These are maximum limits, not recommended display times.
People who are pregnant, young children, older adults, and people with weakened immune systems should avoid raw or undercooked seafood. Use thoroughly cooked salmon for those diners.
Printable Aburi Salmon Nigiri Recipe
Print
Aburi Salmon Nigiri
- Total Time: 80 minutes
- Yield: 16 pieces (4 appetizer servings) 1x
Description
About 16 aburi salmon nigiri pieces made with seasoned sushi rice and separately seared salmon slices. The surface is lightly browned while the center may remain raw or undercooked. Includes a fully cooked alternative.
Ingredients
- 200 g Japanese short-grain white rice, approximately 1 US cup
- Water according to the rice package
- 30 ml unseasoned rice vinegar, 2 tablespoons
- 8 g granulated sugar, 2 teaspoons
- 3 g fine salt, 1/2 teaspoon
- 240 g skinless, boneless salmon intended for the chosen raw or undercooked preparation
- Wasabi, optional
- Soy sauce or verified gluten-free tamari, for serving
- Pickled ginger, optional
- Clean water for moistening fingers
Instructions
- Rinse and drain the rice. Cook according to the rice package or rice cooker directions. Allow its recommended covered rest before seasoning.
- Mix the rice vinegar, sugar, and salt until dissolved. Fold into the hot cooked rice in a wide bowl. Release steam and let the rice become barely warm before adding fish.
- Keep salmon cold. Check for bones and cut about 16 broad slices, approximately 15 g each and 4 to 5 mm thick, adjusting to the shape of the fish. Keep remaining fish refrigerated.
- Lightly moisten clean fingers and shape 20 to 25 g cooked rice into a short oval using a few gentle presses. Prepare a few pieces at a time.
- Set a torch-compatible metal tray and rack on a stable, noncombustible surface. Arrange a few salmon slices on it. Blot excess moisture and remove paper and all combustible items from the area.
- Follow the culinary torch manufacturer’s instructions for ventilation, lighting, flame distance, and operation. Sweep the flame across the salmon until lightly browned in places. Keep it moving and avoid blackening. The center may remain raw or undercooked.
- Switch off and safely set down the torch. Transfer each slice onto a rice oval using clean utensils. Add a tiny dab of optional wasabi between salmon and rice, then gently settle the topping.
- Serve promptly with soy sauce and pickled ginger separately. Work in small batches and keep remaining fish chilled.
Notes
This recipe has not been kitchen-tested; times are estimates and exclude thawing and extra soaking. Follow rice-package instructions. Use a culinary torch only with a suitable noncombustible work area and manufacturer-approved surfaces. Sear the fish separately, not on the serving plate or rice.
Surface searing does not ensure full cooking. Source fish for its intended raw or undercooked use; freezing does not remove every hazard. For a fully cooked alternative, cook the salmon to 145°F (63°C), then divide and place on rice. Pregnant people, young children, older adults, and immunocompromised people should avoid raw or undercooked seafood.
- Prep Time: 35 minutes
- Resting and cooling: 25 minutes
- Cook Time: 20 minutes
- Category: Appetizer
- Method: Stovetop, torch searing and hand shaping
- Cuisine: Japanese-inspired
Nutrition
- Serving Size: 4 pieces
Keywords: aburi salmon nigiri, seared salmon nigiri, aburi salmon, torched salmon sushi
FAQS
What does aburi salmon nigiri mean?
It means hand-shaped sushi rice topped with salmon that has been briefly seared on the surface. The center may remain raw or undercooked.
Is aburi salmon fully cooked?
Not necessarily. Surface searing can brown the outside while leaving the center undercooked. Use a thermometer and thorough cooking if you need a fully cooked version.
What is the difference between salmon nigiri and aburi salmon nigiri?
Regular salmon nigiri commonly uses an unseared topping. Aburi salmon nigiri adds a surface-searing step that creates toasted flavor and changes the outer texture.
Can I use ordinary supermarket salmon?
Do not assume every fillet is suitable for raw or undercooked use. Ask the supplier about the specific product and its handling. If suitability cannot be established, cook it thoroughly.
Should I torch the salmon before or after putting it on rice?
For the home method described here, sear the salmon separately on a torch-compatible surface, then transfer it onto the rice. This keeps direct flame away from the rice and serving plate.
Do I need mayonnaise for aburi salmon?
No. Mayonnaise is optional in some variations, but the basic dish can consist of seasoned sushi rice, salmon, and a small amount of optional wasabi.
Can pregnant people eat aburi salmon nigiri?
Lightly seared salmon may remain raw inside. During pregnancy, choose a version made with thoroughly cooked salmon and follow appropriate food-handling guidance.