
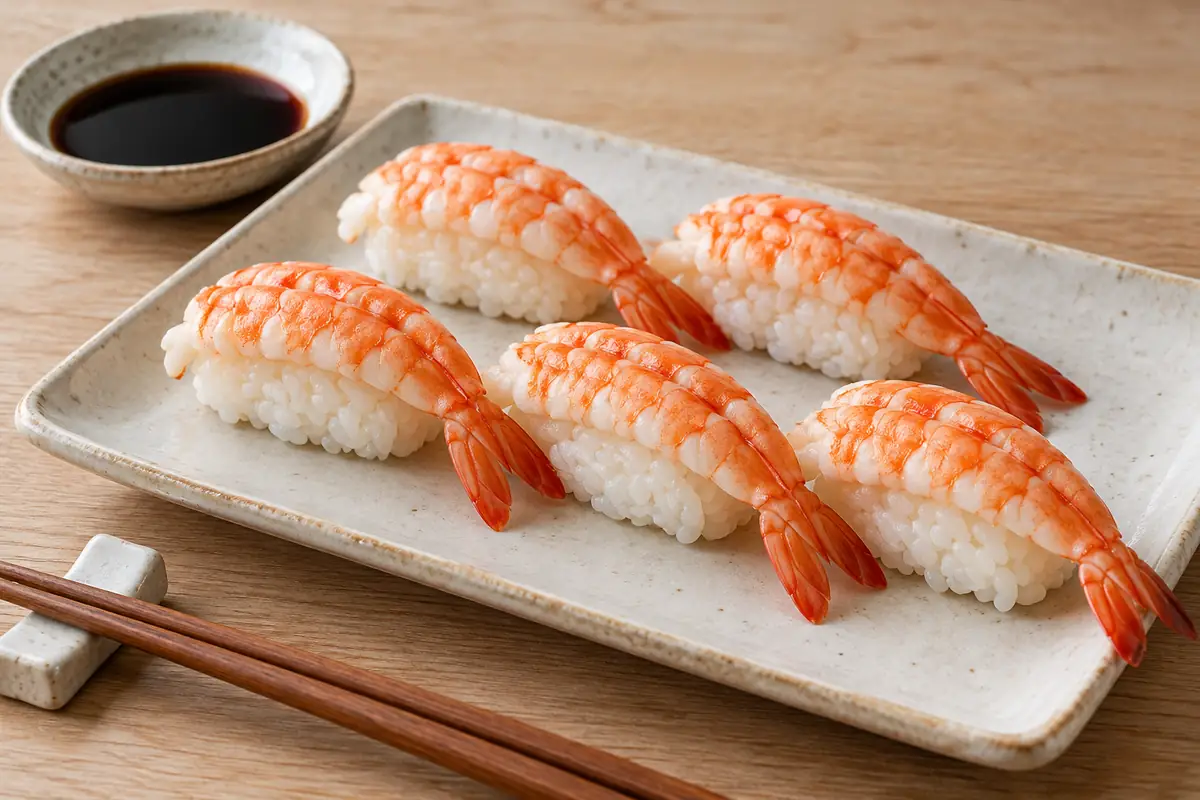
Shrimp nigiri is a piece of hand-shaped, seasoned sushi rice topped with a cooked shrimp that has been opened into a butterfly shape. Often called ebi nigiri, it combines tender shrimp with lightly vinegared rice in a compact, easy-to-pick-up piece.
To make it at home, cook the shrimp, cool and peel them, then carefully cut along the underside so each shrimp opens without separating into two halves. Place the opened shrimp over a gently shaped rice oval and serve with a little soy sauce on the side.
This recipe uses fully cooked shrimp. It is a useful starting point for anyone who wants to make sushi without working with raw fish.
The recipe has not been kitchen-tested. Preparation times and yield are estimates; follow your rice package and check that the shrimp are thoroughly cooked.
What Is Shrimp Nigiri?
Shrimp nigiri belongs to the family of sushi made by placing a topping over hand-shaped, seasoned rice.
The topping is not enclosed inside a roll. Instead, the opened shrimp rests directly on the rice, with its orange-and-white back visible on top.
The Japanese word ebi means shrimp, so menus may call this dish ebi nigiri or ebi sushi.
For an introduction to the different toppings and shapes, read our guide to nigiri sushi. This recipe focuses on preparing the cooked shrimp topping and fitting it neatly over the rice.
Is shrimp nigiri cooked?
The version described here is cooked.
However, not every shrimp item on a sushi menu is prepared in the same way. Some specialty preparations use raw shrimp, so ask about the specific dish rather than assuming that every shrimp sushi item is cooked.
For homemade ebi nigiri using this method, cook the shrimp thoroughly before cooling, peeling, and assembling.
Why Use Cooked Shrimp for Homemade Nigiri?
Cooked shrimp has a mildly sweet flavor and a firmer texture than a raw fish topping. That makes the pieces relatively easy to handle during assembly.
The butterfly shape also provides a broad surface that can sit over the rice without requiring seaweed to hold it in place.
You can prepare the shrimp yourself or use suitable ready-to-eat cooked shrimp as a shortcut. The important points are choosing a practical size, keeping the shrimp cold when necessary, and avoiding excess moisture during assembly.
For another topping with the same hand-shaped rice format, try our salmon nigiri recipe.
Ingredients for Shrimp Nigiri
For the sushi rice
- 200 g Japanese short-grain white rice, approximately 1 US cup
- Water according to the rice package
- 2 tablespoons unseasoned rice vinegar, 30 ml
- 2 teaspoons granulated sugar, approximately 8 g
- 1/2 teaspoon fine salt, approximately 3 g
For the shrimp
- 16 large raw, headless shrimp, preferably shell-on and already deveined
- Water for cooking
- A bowl of clean ice water for cooling
For shaping and serving
- A small bowl of clean water
- Wasabi, optional
- Soy sauce or verified gluten-free tamari
- Pickled ginger, optional
Choose shrimp by their actual size rather than relying only on words such as large or jumbo, which can vary between sellers.
You want each opened shrimp to cover a small rice oval without leaving a large amount of exposed rice at either end.
This recipe makes approximately 16 pieces, or four appetizer servings of four pieces each. You may have some seasoned rice left over.
Which Shrimp Should You Buy?
Look for shrimp that are reasonably similar in size. Consistent shrimp are easier to cook evenly and produce more uniform nigiri.
Raw, shell-on shrimp give you control over the cooking. Buying them already deveined saves preparation time while retaining the shell for cooking.
Frozen shrimp can also work well when thawed and handled according to their packaging instructions.
Can you use peeled shrimp?
Yes. Peeled shrimp are a practical option, especially if that is what you already have.
They may curl more during cooking, but the pieces do not need to be perfectly straight to taste good or sit on rice.
The main challenge is opening them gently after cooking without tearing the flesh. Choose shrimp large enough to handle comfortably.
Can you use precooked shrimp?
Yes, provided they are ready to eat and have been stored and thawed correctly.
Choose plain cooked shrimp rather than heavily seasoned cocktail shrimp. Drain and dry them carefully before assembling.
Do not boil ready-to-eat shrimp again simply to follow the raw-shrimp cooking step. Repeated cooking can make them firm and rubbery.
If the shrimp are already tightly curled, accept a more curved presentation rather than forcing them flat until they split.
Equipment
You will need:
- A saucepan with a lid or a rice cooker
- A second saucepan for the shrimp
- A wide bowl for seasoning the rice
- A rice paddle or spatula
- A slotted spoon
- A sharp small knife
- Clean cutting boards
- A bowl for the ice bath
- A food thermometer, where practical
A bamboo sushi mat is unnecessary because nigiri is shaped by hand.
This home method does not require skewers. The finished shrimp may retain some natural curve, which is acceptable. A clean butterfly cut and a well-sized rice mound matter more than producing perfectly straight pieces.
How to Make Shrimp Nigiri
1. Rinse and cook the rice
Place the rice in a bowl and rinse in several changes of cool water. Move the grains gently with your fingers, then drain well.
Cook according to the rice package or rice cooker instructions. Follow any soaking directions rather than assuming all short-grain rice needs the same preparation.
Once cooked, let the rice rest as directed before transferring it to a wide bowl.
Avoid stirring the rice repeatedly during cooking. The goal is tender grains that hold together without becoming a paste.
2. Mix the vinegar seasoning
Combine the rice vinegar, sugar, and salt in a small bowl. Stir until dissolved, warming gently if needed.
Use unseasoned rice vinegar for these quantities.
If you have a prepared sushi seasoning containing sugar and salt, follow its label and adjust the additional ingredients. Adding both mixtures without checking can make the rice excessively sweet or salty.
3. Season and cool the rice
Sprinkle the vinegar mixture over the hot cooked rice.
Fold with a rice paddle using gentle lifting and cutting movements. Avoid vigorous circular stirring, which can crush the grains.
Spread the rice enough to allow steam to escape. Let it cool until barely warm before shaping.
Vinegar adds flavor, but this home recipe is not a validated process for keeping rice unrefrigerated for an extended period.
4. Prepare the shrimp
If frozen, thaw according to the packaging directions.
Check that the shrimp are deveined. If needed, remove the digestive tract carefully, keeping the shrimp as intact as possible.
For this simple method, cook the shrimp without skewers and accept their natural curve. Do not cut through the back while cleaning the shrimp, because it needs to remain connected when you later open the underside.
Keep raw shrimp and their utensils separate from the cooked rice and other ready-to-eat ingredients.
5. Cook the shrimp thoroughly
Bring a saucepan of water to a gentle boil.
Add the shrimp and cook until done. Large shrimp often take only a few minutes, but the exact time depends on size, starting temperature, and the amount in the pan.
Check the thickest portion rather than relying only on a timer. The flesh should become firm, pearly, and opaque.
The FDA recommends cooking most seafood to 145°F, 63°C, and provides shrimp-specific visual guidance in its seafood handling and cooking advice.
Avoid continuing to boil the shrimp long after they are cooked. Excessive cooking can produce a tough topping.
6. Cool and peel
Transfer the cooked shrimp with a slotted spoon to clean ice water.
Cool promptly, then drain well. Do not leave them soaking while you complete the rest of the recipe.
Peel off the shells. You may retain the tail fan for presentation or remove it for easier eating.
Pat the shrimp dry gently. Water trapped around the shrimp can make the topping slippery and wet the seasoned rice.
Use a clean board and utensils for the cooked shrimp rather than returning them to equipment used for raw seafood.
7. Butterfly the shrimp
Place one peeled shrimp on a clean board with the underside facing upward.
Using a sharp small knife, make a lengthwise cut along the underside. Cut deeply enough for the shrimp to open, but stop before cutting through the back.
Gently spread the two sides outward.
The shrimp should open like a book while remaining connected along the back. Make a shallow cut first, then deepen it gradually if necessary.
Repeat with the remaining shrimp.
8. Shape the rice
Lightly moisten clean fingers and shake off excess water.
Take approximately 20 to 25 g cooked rice and form it into a short oval using a few gentle presses.
The mound should hold together without feeling tightly compressed. It should also be small enough for the opened shrimp to cover comfortably.
Weigh your first few portions if helpful, then use those pieces as a visual reference.
Do not enlarge every mound simply to use all the rice. Save any excess safely for another use.
9. Add the shrimp
If using wasabi, spread a tiny amount on the opened underside of a shrimp.
Place the shrimp over a rice oval, with the orange-and-white back facing upward.
Gently press the shrimp around the rice so the two components sit together. Avoid squeezing hard enough to flatten the grains or tear the topping.
If the shrimp is much smaller than the rice, reduce the mound rather than stretching the shrimp.
10. Serve promptly
Arrange the pieces on a clean plate.
Serve soy sauce and pickled ginger separately. A small amount of sauce is usually enough; soaking the rice can cause it to break apart.
If you retained the tails, let diners know that they can remove the tail before eating.
For a larger group, assemble in small batches and keep unused shrimp refrigerated.
How to Butterfly Shrimp Without Cutting Through
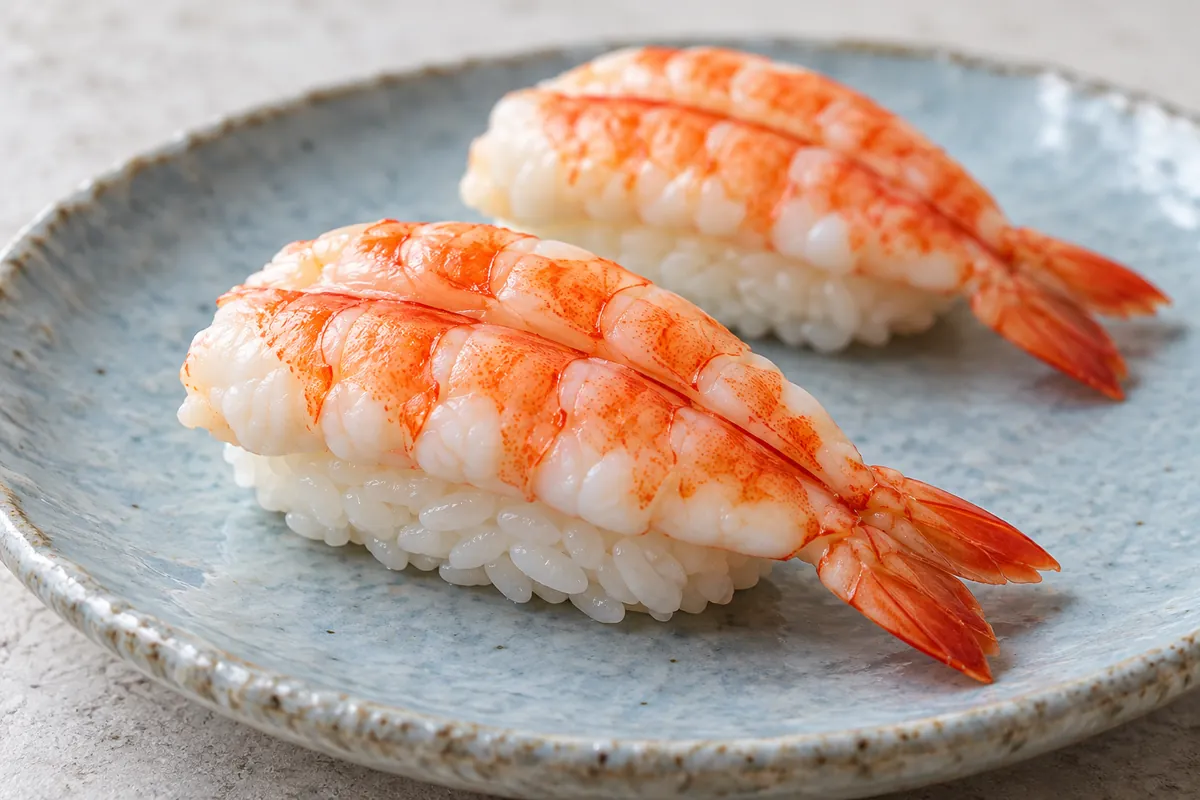
Start from the underside, which is the inner curve of the shrimp.
Make a controlled cut along the center, then stop and gently test whether the sides will open.
If the shrimp remains tightly closed, deepen the cut slightly. Do not force the sides outward against an uncut section.
A sharp knife helps because it requires less pressure. Keep your fingers away from the blade and work on a stable board.
If you accidentally cut one shrimp into two pieces, you can still use it as part of a rice bowl or another dish. There is no need to hold torn pieces together with excessive pressure.
Why Does My Shrimp Curl?
Curling is normal as shrimp cook.
For homemade nigiri, a moderate curve is manageable. Opening the underside creates a broader shape that can sit over rice.
Very small shrimp or shrimp that are already tightly curled can be harder to spread neatly.
Choose a practical size and avoid overcooking. Do not keep reheating the shrimp in an attempt to straighten it.
If presentation is particularly important, ready-prepared cooked butterfly shrimp intended for sushi can be another option, provided the product is handled according to its label.
Troubleshooting Shrimp Nigiri
| Problem | Likely cause | What to change |
|---|---|---|
| Shrimp tastes rubbery | Too much cooking | Check doneness earlier |
| Shrimp tears when opened | Cut too deep or forced apart | Deepen the underside cut gradually |
| Topping slides off | Excess surface water | Drain and pat dry |
| Rice feels dense | Too much shaping pressure | Use fewer, lighter presses |
| Rice sticks to fingers | Hands too dry | Moisten lightly |
| Rice falls apart when dipped | Too much sauce absorbed | Use a smaller amount of sauce |
| Shrimp does not cover the rice | Rice mound too large | Reduce the rice portion |
Uneven pieces are normal when learning.
Aim first for tender shrimp, seasoned rice, and comfortable portions. Uniform presentation improves with repetition.
Shrimp Nigiri vs Shrimp Tempura Rolls
Shrimp nigiri uses a cooked shrimp positioned over a small rice oval.
A shrimp tempura roll usually contains battered, fried shrimp rolled with rice and other ingredients, often with nori.
These dishes differ in texture, preparation, and serving style. This recipe does not require batter, deep frying, or rolling.
If you are comparing sushi formats, our nigiri vs sashimi guide explains how rice and presentation distinguish several common menu terms.
Serving Ideas
Serve shrimp nigiri as an appetizer or combine it with cucumber salad, edamame, and soup.
Keep sauces separate so everyone can control the seasoning.
You can also offer different nigiri toppings on the same platter, provided each ingredient is handled appropriately.
For a contrasting topping with a lightly seared surface, see our aburi salmon nigiri recipe.
When preparing an assortment, keep raw seafood and its utensils separate from cooked shrimp and other ready-to-eat components.
Make-Ahead and Storage
You can measure the rice seasoning and prepare serving dishes ahead.
Cooked shrimp may also be prepared ahead and refrigerated promptly in a covered container. Follow the product’s storage directions and keep the shrimp chilled until assembly.
Freshly prepared rice generally provides a more pleasant shaping texture than refrigerated rice, which becomes firmer.
If storing cooked rice, cool it quickly, refrigerate promptly, and follow the UK government’s guidance to use refrigerated cooked rice within 24 hours.
For the finished nigiri, assemble near serving time rather than planning several days of prepared sushi.
Keep seafood at 40°F, 4°C, or below when refrigerated. The FDA advises limiting unrefrigerated time for perishables to two hours, or one hour when temperatures exceed 90°F, 32°C.
Printable Shrimp Nigiri Recipe
Print
Shrimp Nigiri
- Total Time: 85 minutes
- Yield: 16 pieces (4 appetizer servings) 1x
Description
About 16 shrimp nigiri pieces made with fully cooked butterfly shrimp and seasoned Japanese short-grain rice. Includes peeling, underside cutting, and gentle hand-shaping instructions.
Ingredients
- 200 g Japanese short-grain white rice, approximately 1 US cup
- Water according to the rice package
- 30 ml unseasoned rice vinegar, 2 tablespoons
- 8 g granulated sugar, 2 teaspoons
- 3 g fine salt, 1/2 teaspoon
- 16 large raw headless shrimp, preferably shell-on and already deveined
- Water for cooking shrimp
- Clean ice water for cooling shrimp
- Clean water for moistening hands
- Wasabi, optional
- Soy sauce or verified gluten-free tamari, for serving
- Pickled ginger, optional
Instructions
- Rinse and drain the rice. Cook according to package or rice cooker instructions and allow the recommended covered rest.
- Mix rice vinegar, sugar, and salt until dissolved. Fold into the hot cooked rice gently, then release steam and cool until barely warm.
- Thaw frozen shrimp according to the package. Check that they are deveined without cutting through the back. Keep raw shrimp separate from cooked rice and clean utensils.
- Bring a saucepan of water to a gentle boil. Cook shrimp thoroughly; timing varies with size. Aim for 145°F (63°C) internally, with firm, pearly, opaque flesh. Do not rely only on a fixed time.
- Transfer to clean ice water to cool promptly, drain well, and peel. Remove the tails if preferred. Pat dry and use a clean board and utensils for cooked shrimp.
- Place each shrimp underside up. Carefully cut lengthwise along the underside without cutting through the back, then gently open like a book.
- Lightly moisten clean fingers. Form about 20 to 25 g cooked rice into a small oval using a few gentle presses. Make about 16 pieces; excess rice may remain.
- Add a tiny dab of optional wasabi to the opened underside of a shrimp. Set it over the rice with the orange-and-white back upward, and press gently to settle.
- Serve promptly with soy sauce and ginger separately. Keep unused shrimp chilled and work in small batches.
Notes
This recipe has not been kitchen-tested. Times and yield are estimates and exclude thawing and extra soaking. Follow the rice package. This home method does not require skewers; some shrimp curvature is acceptable. Plain ready-to-eat cooked shrimp can be substituted when handled according to their label; skip raw-shrimp cooking and avoid unnecessary reheating.
Contains crustacean shellfish. Verify soy sauce and other accompaniments for allergens. Keep seafood refrigerated at 40°F (4°C) or below. Limit unrefrigerated time to two hours, or one hour above 90°F (32°C). Cool stored rice quickly, refrigerate promptly, and use within 24 hours. Assemble close to serving.
- Prep Time: 35 minutes
- Resting and cooling: 25 minutes
- Cook Time: 25 minutes
- Category: Appetizer
- Method: Stovetop and hand shaping
- Cuisine: Japanese-inspired
Nutrition
- Serving Size: 4 pieces
Keywords: shrimp nigiri, ebi nigiri, shrimp nigiri recipe, cooked shrimp sushi
FAQS
Is shrimp nigiri cooked or raw?
This recipe uses fully cooked shrimp. Some specialty shrimp sushi preparations are raw, so check the specific dish when ordering at a restaurant.
What does ebi nigiri mean?
Ebi means shrimp. Ebi nigiri commonly refers to a shrimp topping served over a small hand-shaped mound of seasoned sushi rice.
Can I use frozen shrimp?
Yes. Thaw them according to the packaging instructions, cook thoroughly, and cool promptly before preparing the topping.
Can I use precooked shrimp?
Yes, if they are ready to eat and have been stored correctly. Drain and dry them before assembly. Avoid boiling them again unnecessarily.
How do you cut shrimp for nigiri?
After cooking and peeling, cut lengthwise along the underside without cutting through the back. Gently open the two sides into a butterfly shape.
Do I need a sushi mat?
No. Nigiri is shaped by hand, so a rolling mat is not required.
Can I remove the shrimp tails?
Yes. Keeping the tail is a presentation choice. Removing it can make the finished pieces easier to eat.
Is shrimp nigiri gluten-free?
The basic rice and plain shrimp may be gluten-free, but sauces, vinegar blends, wasabi mixtures, and cross-contact can change that. Verify every ingredient when gluten avoidance is necessary.
1 thought on “Shrimp Nigiri Recipe: How to Make Ebi Sushi at Home”